
Excel is one of the most popular spreadsheet programs out there, with over 2 billion people using it around the world. However, when more than one person works on the same spreadsheet, they may make changes that aren’t essential, which could put your data at risk.
💡 Ready to test your Excel knowledge?
This tutorial will show you how to lock cells in Excel, open certain ranges for other people, set permissions, and avoid making frequent mistakes.
How to Lock Every Cell in Excel
Locking all the cells and protecting the spreadsheet keeps your data safe. You can do this in just a few easy steps:
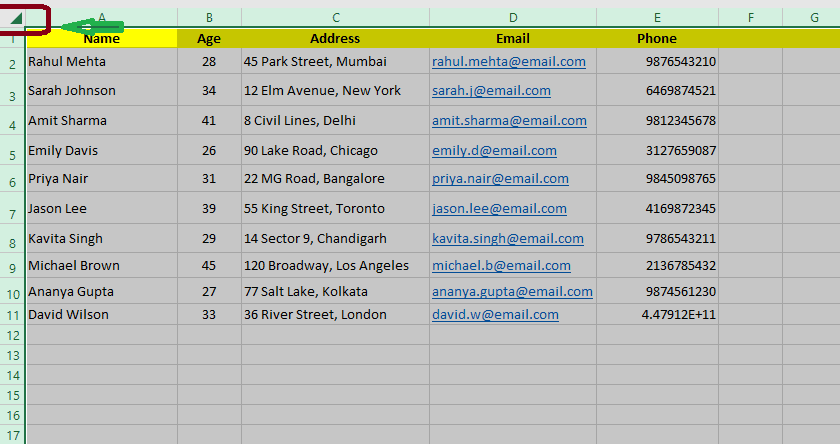
Step 1: Choose the Whole Sheet
- To choose all the cells, press Ctrl + A or click the triangle in the upper left corner of the sheet.
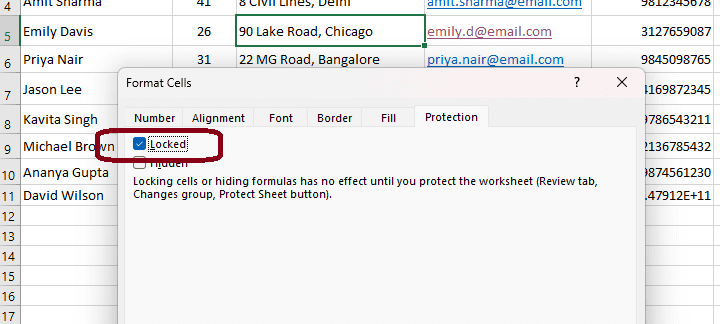
Step 2: Check to See If Cells Are Locked
- Right-click on the selected sheet and choose Format Cells (or press Ctrl + 1).
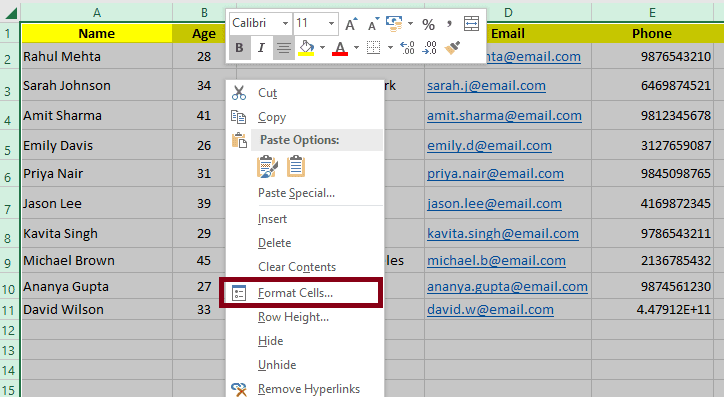
- Make sure the Locked box is checked on the Protection tab.

- (It typically is, but it’s always a good idea to check again.)
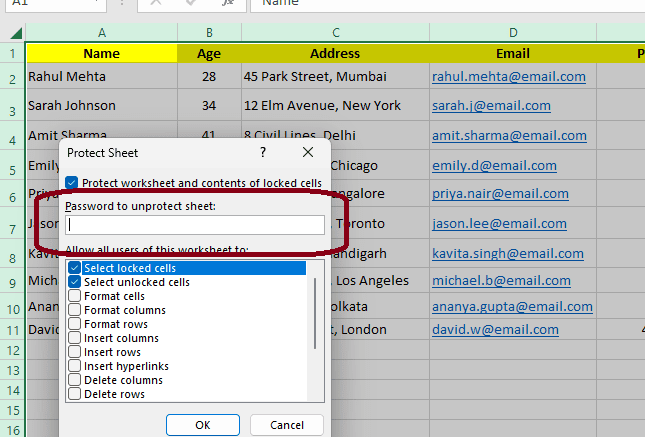
Step 3: Keep the Sheet Safe
- Click on the Review tab → Protect Sheet.

- When requested, type in a password (you’ll have to confirm it).
Step 4: Choose What Users Can Still Do
- Excel will show you a list of things that users can perform after you choose a password, such as:
- Formatting cells
- Selecting cells
- You can tick and uncheck what you want users to be able to perform.
Step 5: Click OK to Lock It
- You are done now.
- Click OK.
- Your sheet is safe. All cells are locked, and only the permissions you give will work.
ALSO READ: How to Create a Gantt Chart in Excel
How to Lock Certain Cells in Excel
You can lock only the cells you don’t want to change if you want to. Here’s how to do it:
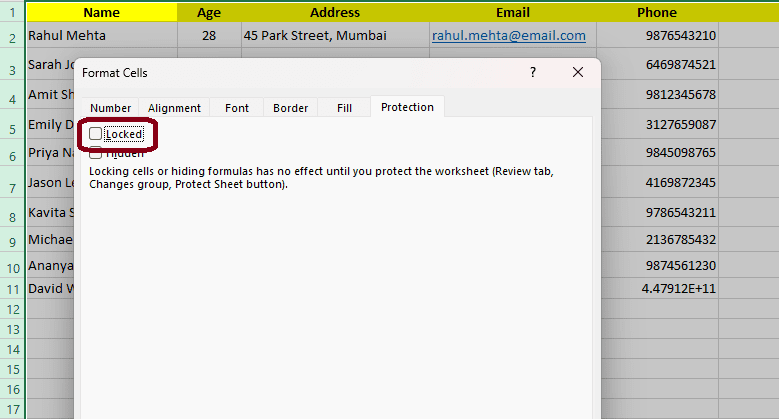
Step 1: First, Unlock All the Cells
- Use Ctrl + A to select the complete sheet.
- Click Format Cells after right-clicking.
- On the Protection tab, uncheck the box next to Locked and then click OK.
Step 2: Only Lock the Cells You Need
- Choose the cells you want to lock.
- Choose Format Cells by right-clicking.
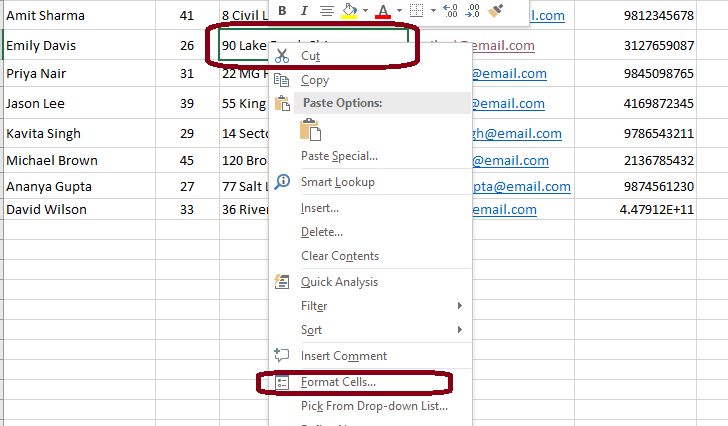
- Check Locked on the Protection tab and then click OK.
Step 3: Keep the Sheet Safe
- Click Protect Sheet on the Review tab.
- Type in a password and click OK.

How to Unlock Ranges for Certain Users
You can use Excel’s “Allow Users to Edit Ranges” option to let certain persons edit certain parts of a document while keeping everything else locked and safe.
Step 1: Turn on the “Allow Users to Edit Ranges” Feature
- On the Excel ribbon, click the Review tab.
- When the window opens, click on Allow Edit Ranges and then click on New.
Step 2: Make a Range for the Sales Team
- In the New Range window, give the cells that are marked as SalesData a name.
- Type B3:E10 under Refers to cells.
- To conclude this step, type in a password like sales789, re-enter it to confirm, and then click OK.
Step 3: Set Up a Range for the Inventory Team
- Click New again.
- Give the range a name UpdateInventory.
- The cell range is G3:G20.
- Pick a password like inv123 and then type it in again.
Step 4: Keep the Sheet Safe
- Go to Review → Protect Sheet, set a password, and then click OK.
- This means that anyone who wants to change the Sales or Inventory parts will now need to enter the correct password for each part.
Conclusion
Locking cells in Excel keeps data safe by stopping others from making changes without permission. This post shows you exactly how to lock certain cells or formulas so that only the parts of your worksheet that you want to be changeable are.
When you learn these skills, you can protect your data and stop changes from happening by accident, which makes shared workbooks more secure and useful.
Frequently Asked Questions
How Do I Lock Cells in Excel?
To lock cells in Excel, you need to first unlock all of them. To do this, select the whole sheet and uncheck “Locked” in the “Format Cells” menu. Then, in the same dialog, choose certain cells, check the box next to “Locked,” and use the “Review” tab to protect the sheet.
Can I Lock Only Certain Cells in Excel?
Yes, you can lock specific cells in Excel. To begin, unlock every cell in the worksheet. After that, choose the cells you wish to lock, check the box next to “Locked” in the “Format Cells” window, and safeguard the sheet from locking.
What is the Formula for Locking a Cell in Excel?
There is no formula in Excel for locking cells. Instead, use the “Format Cells” dialog to lock cells, and then use the “Review” tab to protect the worksheet to make sure the locking works.
💡 Ready to test your Excel knowledge?