XcelNoteXcelNote
  • MS Excel Intro
  • Tips & Tricks
  • Tutorial
  • Excel Formulas
  • Excel Shortcut
Reading: How to Change HORIZONTAL Data to VERTICAL in Excel
Share
Notification Show More
Font ResizerAa
XcelNoteXcelNote
Font ResizerAa
  • MS Excel Intro
  • Tips & Tricks
  • Tutorial
  • Excel Formulas
  • Excel Shortcut
Search
  • MS Excel Intro
  • Tips & Tricks
  • Tutorial
  • Excel Formulas
  • Excel Shortcut
Follow US
Copyright © 2014-2023 Ruby Theme Ltd. All Rights Reserved.
XcelNote > Blog > Tutorial > How to Change HORIZONTAL Data to VERTICAL in Excel
Tutorial

How to Change HORIZONTAL Data to VERTICAL in Excel

skynet By skynet Last updated: March 31, 2025 2 Min Read
How to Change HORIZONTAL Data to VERTICAL in Excel
SHARE

When working with data in Excel, you may need to transpose a horizontal row to a vertical column (or vice versa). Excel has some simple methods for doing this efficiently. Here are two efficient methods for switching data from horizontal to vertical.

Contents
Method 1: Using Transpose (Paste Special)Method 2: Using the TRANSPOSE FunctionFinal Thoughts

Method 1: Using Transpose (Paste Special)

The simplest way to change data orientation is to use Excel’s Transpose tool.

Step 1: Select the horizontal data range you want to convert.

Method 1: Using Transpose (Paste Special)

Step 2: Press Ctrl + C to copy the data.

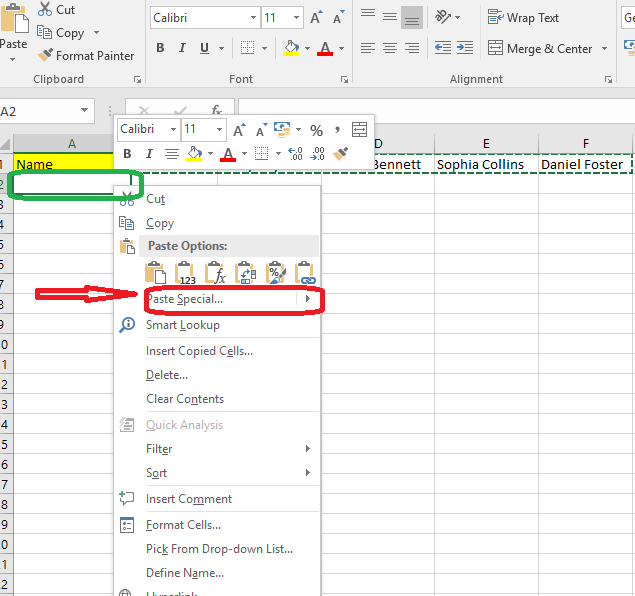
Step 3: Click on an empty cell where you want the vertical data to begin.

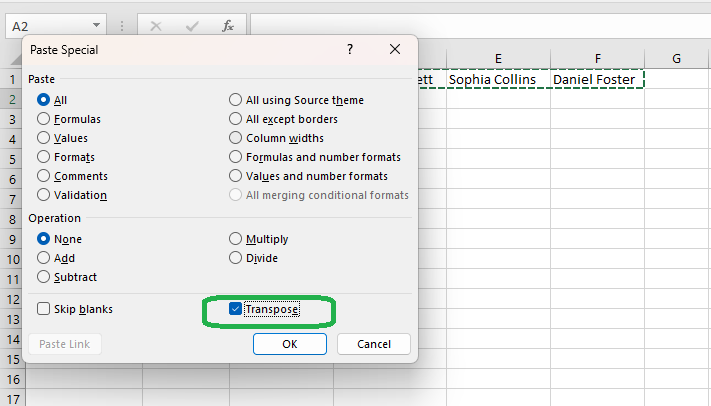
Step 4: Right-click and select Paste Special > Transpose (or press Ctrl + Alt + V, then select Transpose and click OK).

Step 5: The data will now be pasted vertically.

Method 2: Using the TRANSPOSE Function

If you want to keep the data dynamically connected (so that changes are automatically updated), use the TRANSPOSE function.

STEP 1: Select a vertical range that matches the number of horizontal cells you want to transpose.

Select a vertical range that matches the number of horizontal cells you want to transpose.

STEP 2: Type the formula:

=TRANSPOSE(B1:F1)

(Replace B1:F1 with your actual range.)

STEP 3: Press Ctrl + Shift + Enter (for older Excel versions) or simply press Enter (for newer versions with dynamic arrays).

Your data will now appear vertically and update automatically if the original data changes.

Final Thoughts

Switching data from horizontal to vertical in Excel is simple if you use the appropriate technique. The Transpose (Paste Special) approach is ideal for static data, but the TRANSPOSE function performs better when data is dynamic. For huge datasets, Power Query provides an advanced solution. Select the strategy that best meets your needs and enhance your Excel workflow!

TAGGED:DataManagementExcelTipsSpreadsheetHacksTransposeExcel

Sign Up For Daily Newsletter

Be keep up! Get the latest breaking news delivered straight to your inbox.
[mc4wp_form]
By signing up, you agree to our Terms of Use and acknowledge the data practices in our Privacy Policy. You may unsubscribe at any time.
Share This Article
Facebook Twitter Copy Link Print
Previous Article How to Delete Blank Cells in Excel How to Delete Blank Cells in Excel
Next Article How to Auto-Adjust Cell Width and Height in Excel How to Auto-Adjust Cell Width and Height in Excel
FacebookLike
TwitterFollow
PinterestPin
InstagramFollow
YoutubeSubscribe
QuoraFollow
Most Popular
How to Combine Text from Two or More Cells into One Cell in Excel
April 2, 2025
MS Excel (Microsoft Excel) – A Complete Guide
March 31, 2025
How to Force Quit Excel on Windows
March 31, 2025
How to Auto-Adjust Cell Width and Height in Excel
March 31, 2025
How to Change HORIZONTAL Data to VERTICAL in Excel
March 31, 2025

You Might Also Like

How to Delete Blank Cells in Excel
Tutorial

How to Delete Blank Cells in Excel

3 Min Read
How to Create a qbj File From Excel
Tutorial

How to Create a qbj File From Excel

2 Min Read
How to Create an Expense Tracker in Excel
Tutorial

How to Create an Expense Tracker in Excel

5 Min Read
Create a NACHA file in Excel
Tutorial

How to Create a NACHA File in Excel

3 Min Read
XcelNote

“Unlock the Power of Excel: Your Ultimate Tutorial Hub” is your go-to destination for mastering Microsoft Excel. 

Quick links

  • About Us
  • Contact Us
  • Privacy Policy
  • Terms and Conditions
Go to mobile version
Welcome Back!

Sign in to your account


Lost your password?