
The Quick Access Toolbar (QAT) in Excel is one of the most underused productivity features in the application. It’s a small, always-visible toolbar at the very top of the Excel window that gives you instant one-click access to your most-used commands—regardless of which tab you’re currently on.
In this tutorial, you’ll get an in-depth look at everything you can do with the Quick Access Toolbar in Excel—from adding and removing commands to changing its position, reordering buttons, and exporting your custom setup to use on another computer.
This guide covers Excel 2010, 2013, 2016, 2019, 2021, and Microsoft 365.
📋 What you’ll learn: What the QAT is, where to find it, how to add commands, change position, reorder buttons, customize via Options, reset to defaults, and export/import settings.
RELATED: How to Strikethrough Text in Excel — 4 Quick Methods
What Is the Quick Access Toolbar in Excel?
The Quick Access Toolbar (QAT) is a small, customizable toolbar that sits in the Title Bar of the Excel window—by default positioned in the top-left corner, above the ribbon. It displays a set of frequently used command buttons that are always accessible, no matter which ribbon tab is active.
By default, Excel includes a few standard commands in the QAT:
- Save (Ctrl+S)
- Undo (Ctrl+Z)
- Redo (Ctrl+Y)
- Customize Quick Access Toolbar dropdown (the small arrow at the end)
The real power of the QAT comes when you customize it. You can add any Excel command — including ones that don’t appear on any ribbon tab — and access them with a single click or with keyboard shortcuts (Alt+1, Alt+2, etc.).
💡 Keyboard shortcut tip: Press Alt on your keyboard to reveal number shortcuts for every button in the QAT. For example, if Save is the first button, pressing Alt then 1 saves your file instantly.
Quick Example: Using the QAT to Sort Data Descending
Here’s a practical example showing how the QAT saves time. Suppose you have a column of values and want to sort them in descending order with one click — without navigating to the Data tab each time.
- Click the Customize Quick Access Toolbar dropdown arrow at the end of the QAT.
- Select Sort Descending (also called ‘Sort Largest to Smallest’) from the dropdown. If it’s not listed, select More Commands to find and add it.
- The Sort Largest to Smallest button now appears in the QAT at the top of the ribbon.
- Select your data range (e.g., A2:A6) and click the Sort Largest to Smallest button.
✅ Result: Your data is sorted in descending order with a single click — no need to open the Data tab or use any menus. This is the core value of the Quick Access Toolbar.
Key Facts About the Quick Access Toolbar
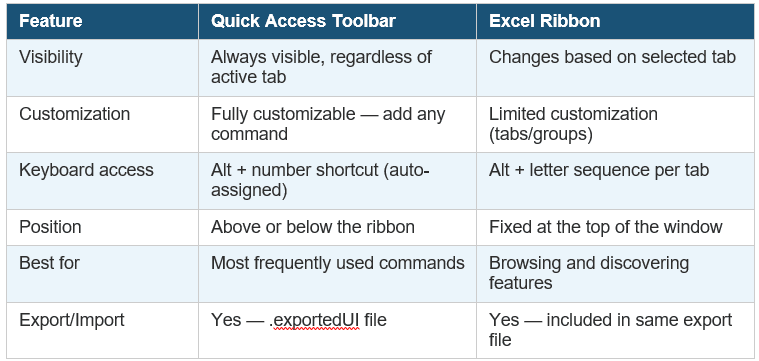
- Always visible: The QAT is available regardless of which ribbon tab is currently selected.
- Fully customizable: Add, remove, or reorder any Excel command — including ones not shown on the ribbon.
- Two positions: The toolbar can sit above the ribbon (default) or below it, just above the spreadsheet area.
- Exportable settings: You can export your QAT customizations to a file and import them on any other computer.
- Keyboard accessible: Every QAT button gets an Alt+number keyboard shortcut automatically assigned by Excel.
- Version compatible: Works in Excel 2010, 2013, 2016, 2019, 2021, and Microsoft 365.
How to Open and Use the Quick Access Toolbar
The QAT is always visible at the top of the Excel window. To interact with it:
- Click any button on the QAT to execute that command immediately.
- Click the dropdown arrow at the right end of the QAT to see default commands you can add or remove.
- Press Alt to reveal the keyboard shortcut numbers assigned to each QAT button.
Example 1: How to Add Commands to the Quick Access Toolbar
You can add almost any Excel command to the QAT—including commands that don’t appear on any ribbon tab. Here’s how:
Method A: Using the QAT Dropdown (Quick)
- Click the Customize Quick Access Toolbar dropdown arrow at the right end of the QAT.
- You’ll see a list of common commands. Click any command to add it to your QAT immediately. A checkmark appears next to commands already added.
Method B: Using More Commands (Full Access)
- Click the QAT dropdown arrow and select More Commands.
- The Excel Options window opens with Quick Access Toolbar selected on the left.
- In the ‘Choose commands from’ dropdown on the left, select a category (e.g., All Commands to see every available Excel command).
- Scroll through the list, find the command you want, select it, and click Add. It moves to the right-hand list (your current QAT).
- Click OK. The command now appears in your QAT.
Method C: Right-Click Any Ribbon Button
The fastest way to add a specific ribbon button to the QAT is to right-click it directly on the ribbon and choose ‘Add to Quick Access Toolbar’.
💡 Pro Tip: Use ‘All Commands’ in the ‘Choose commands from dropdown to find commands that aren’t shown on any ribbon tab—like Speak Cells, Camera, or Form. These hidden gems are only accessible via the QAT.
Example 2: How to Change the Position of the QAT
By default, the Quick Access Toolbar sits above the ribbon in the Title Bar. If you prefer it closer to your data, you can move it below the ribbon — just above the spreadsheet area.
- Click the Customize Quick Access Toolbar dropdown arrow.
- Select ‘Show Below the Ribbon’ from the dropdown.
- The QAT instantly moves from the title bar to a position just below the ribbon tabs and above the spreadsheet.
To move it back above the ribbon, click the dropdown again and select ‘Show Above the Ribbon’.
💡 Which position is better? Above the ribbon keeps your workspace area larger. Below the ribbon places the QAT closer to your data and may feel more natural for frequent users.
Example 3: Customizing the QAT via File → Options
You can also access the full QAT customization panel through Excel’s Options menu — useful if you’re already in the File menu or prefer the Options route.
- Click the File tab on the ribbon.
- Click Options at the bottom of the left panel. (In some versions: File → More → Options.)
- In the Excel Options dialog, click Quick Access Toolbar in the left-hand list.
- Add, remove, or reorder commands exactly as described in Example 1. Click OK to apply.
Example 4: Changing the Order of QAT Commands (and Resetting to Default)
The order of buttons in the QAT determines their Alt+number keyboard shortcuts. You can reorder them anytime or reset everything back to Excel’s default setup.
Reordering Commands
- Open the QAT customization panel (QAT dropdown → More Commands, or File → Options → Quick Access Toolbar).
- In the right-hand list (your current QAT commands), select the command you want to move.
- Use the Up and Down arrow buttons on the right side of the list to move the command to your desired position.
- Click OK to apply the new order.
Resetting to Default
- In the QAT customization panel, look for the Reset dropdown at the bottom of the panel.
- Click Reset and choose either ‘Reset only Quick Access Toolbar’ (removes your custom buttons) or ‘Reset all customizations’ (resets both the QAT and ribbon).
- Click OK to confirm.
⚠️ Note: Resetting the QAT cannot be undone. Make sure to export your customizations (Example 5) before resetting if you might want to restore them later.
ALSO READ: How to Make All Cells the Same Size in Excel
Example 5: Export and Import QAT Customizations
If you’ve spent time customizing your QAT and want to use the same setup on a different computer — or back it up before reinstalling Excel — you can export all your settings to a file and import them anywhere.
How to Export Your QAT Settings
- Open the QAT customization panel (QAT dropdown → More Commands).
- At the bottom of the panel, click the Import/Export dropdown.
- Select ‘Export all customizations.’
- Choose a save location and click Save. Excel saves your QAT (and ribbon) settings as an .exportedUI file.
- Click OK in the Excel Options dialog.
How to Import QAT Settings on Another Computer
- On the new computer, open the QAT customization panel (QAT dropdown → More Commands).
- Click the Import/Export dropdown and select ‘Import customization file’.
- Browse to the .exportedUI file you exported, select it, and click Open.
- Click OK. Your custom QAT settings are instantly applied to the new Excel installation.
✅ Great for IT teams: System admins can set up a master QAT configuration and deploy it across the whole organization using the import/export feature—ensuring every user has the same standardized toolbar.
Important Tips and Limitations
- Button size cannot be changed: QAT button sizes are fixed. To make them appear larger, increase your screen resolution in Windows Display Settings.
- Limited visible buttons: You can add as many commands as you like, but only a certain number are visible based on your screen width. The rest are accessible via the overflow arrow.
- QAT works for all workbooks: By default, QAT customizations apply to all documents. You can also configure commands for specific workbooks only using the dropdown in the customization panel.
- Ribbon right-click is fastest: The quickest way to add a ribbon button to the QAT is to right-click it and choose ‘Add to Quick Access Toolbar’ — no dialogs needed.
- Alt shortcuts auto-assign: You cannot manually set which Alt+number a button gets — Excel assigns them left to right. To control the shortcut number, reorder the buttons.
Quick Access Toolbar vs. Excel Ribbon — Key Differences
Frequently Asked Questions
What is the purpose of the Quick Access Toolbar in Excel?
The Quick Access Toolbar gives you one-click access to your most-used Excel commands, no matter which ribbon tab is currently active. It saves time by eliminating the need to switch tabs or navigate menus for frequently used actions like Save, Undo, Sort, or any custom command you add.
Where is the Quick Access Toolbar in Excel?
By default, the QAT is located in the Title Bar at the very top-left of the Excel window, above the ribbon. You can move it below the ribbon by clicking the QAT dropdown arrow and selecting ‘Show Below the Ribbon’.
How do I add a command to the Quick Access Toolbar?
There are three ways: (1) Click the QAT dropdown arrow and select a command from the list. (2) Right-click any ribbon button and choose ‘Add to Quick Access Toolbar’. (3) Go to File → Options → Quick Access Toolbar, choose a command, and click Add.
Can I use keyboard shortcuts with the Quick Access Toolbar?
Yes. Press Alt to reveal number shortcuts for each QAT button. The first button is Alt+1, the second is Alt+2, and so on. Excel assigns these automatically from left to right. To control which number a button gets, reorder the buttons in the customization panel.
How do I reset the Quick Access Toolbar to default?
Go to the QAT customization panel (QAT dropdown → More Commands), scroll to the bottom, click the ‘Reset’ dropdown, and choose ‘Reset only Quick Access Toolbar.’ This removes all custom buttons and restores the default Save, Undo, and Redo commands.
Can I use my customized QAT on a different computer?
Yes. Use the Export feature in the QAT customization panel (Import/Export → Export all customizations) to save your settings as an .exportedUI file. On the new computer, use Import to load that file and apply your settings instantly.
Final Thoughts
The Quick Access Toolbar is one of the simplest ways to speed up your Excel workflow. Once you customize it with the commands you use most—whether that’s Sort, Print Preview, Format Cells, or a custom macro button—you’ll never want to go back to hunting through the ribbon.
Start by adding three or four of your most-used commands. Use the keyboard shortcuts (Alt+1, Alt+2…) and you’ll find your hands barely need to leave the keyboard when working in Excel.