

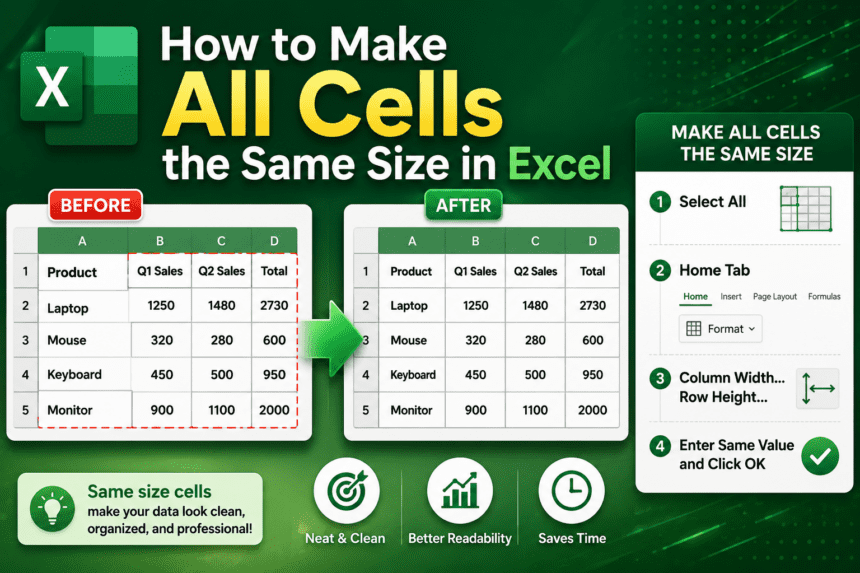
Uniform cell sizes make your Excel worksheets look clean, professional, and easy to read. Whether you’re building a report, a data entry form, or a dashboard, making all cells the same size in Excel is one of the first formatting steps worth mastering.
Excel’s default settings often leave cells at inconsistent widths and heights—especially after importing data. In this guide, you’ll learn 6 practical methods to resize all cells to the same size, from quick keyboard shortcuts to a fully automated VBA macro.
📋 What you’ll learn: AutoFit shortcuts, mouse drag resizing, right-click menu, Paste Special column width, Home ribbon tools, and a VBA macro for automated cell sizing.
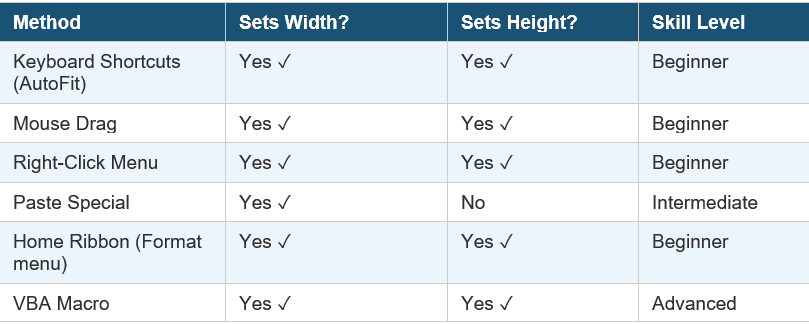
Quick Comparison — 6 Methods at a Glance
ALSO READ: How to Merge Excel Files — 5 Easy Ways to Combine Excel Files into One
Method 1: Keyboard Shortcuts (AutoFit — Fastest Method)
This is the quickest way to make all cells the same size in Excel. It uses Excel’s built-in AutoFit commands to automatically adjust column widths and row heights to fit the content in each cell.
💡 Best for: Datasets where all cells contain content of similar length — AutoFit sizes everything to fit neatly without overflow or gaps.
Step 1: Select All Cells
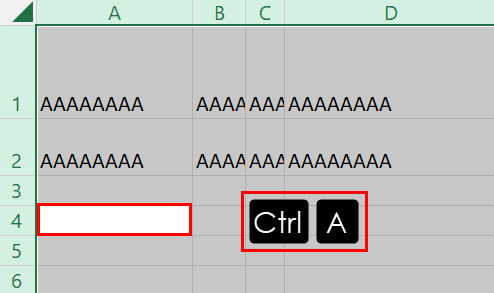
Click on any blank cell in the worksheet, then press Ctrl + A to select every cell in the spreadsheet.
Step 2: AutoFit Column Width
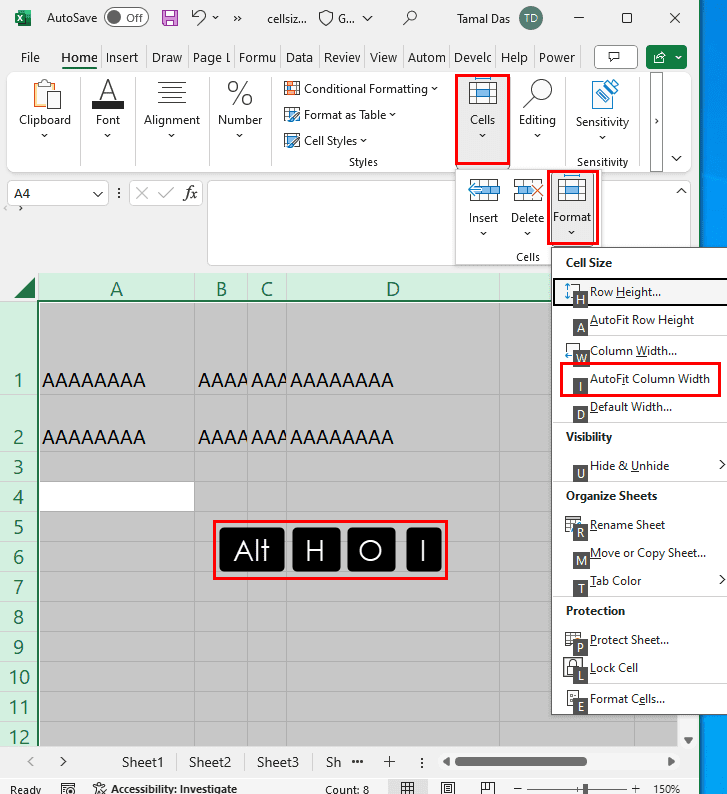
With all cells selected, press the keyboard shortcut:
Alt + H + O + IThis triggers the AutoFit Column Width command from the Home → Cells → Format menu. Excel will resize every column to fit its widest content.
Step 3: AutoFit Row Height
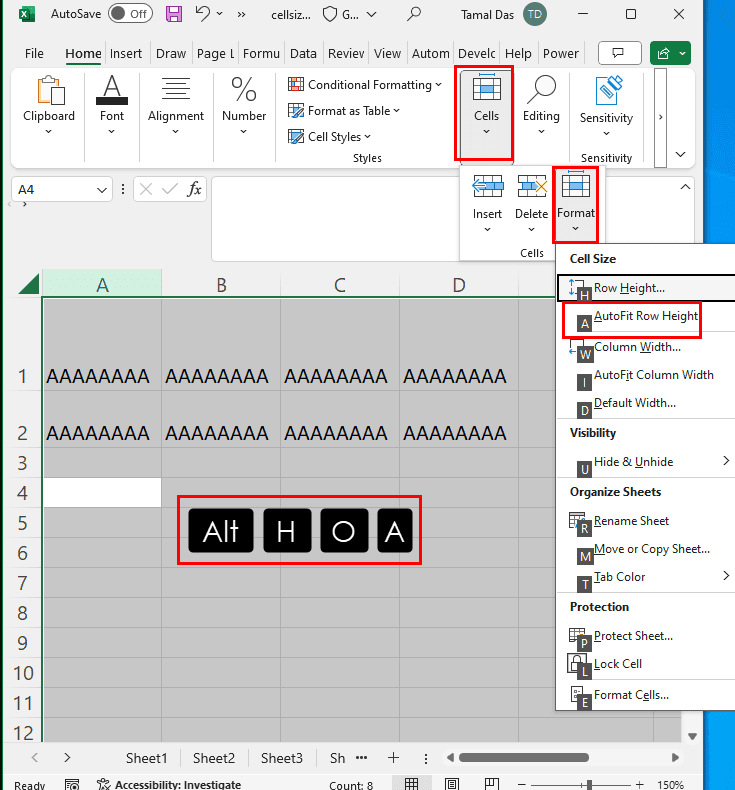
Now press the AutoFit Row Height shortcut to match all row heights:
Alt + H + O + AThis resizes all row heights uniformly based on the tallest content in each row.
⚠️ Note: AutoFit works best when all cells contain data of similar length. If some cells have much longer text than others, AutoFit will make those columns wider — which may not give perfectly uniform results.
Method 2: Select All & Drag with the Mouse
This manual method gives you precise control over the exact pixel size. It’s ideal when you already know the specific width and height you want — for example, when matching the layout of another document.
Step 1: Check the Current Cell Dimensions
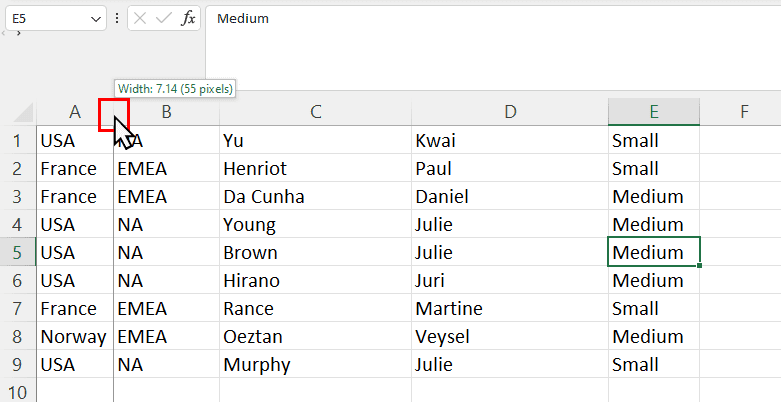
Before resizing, find the target dimensions. Click and hold on the right edge of any column header to see the column width in pixels. The tooltip disappears quickly, so hold your click to keep it visible.
Do the same for row height: click and hold the bottom edge of any row number to see the row height value.
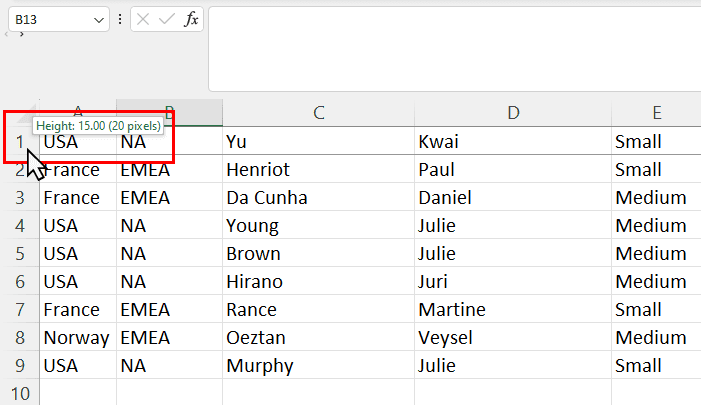
Click and hold the bottom edge of a row number to see the current pixel height
Step 2: Select All Cells
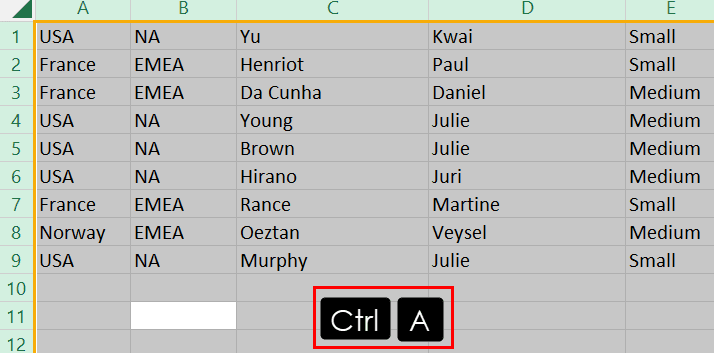
Press Ctrl + A to select all cells, or click the triangle icon in the top-left corner of the grid (above row 1 and left of column A) to select the entire worksheet.
All cells selected — ready for uniform resizing
Step 3: Drag to Set Column Width
Click and hold on the right edge of any column header and drag left or right. As you drag, a tooltip shows the current pixel width. Release when you reach your target value — Excel applies that width to all selected columns simultaneously.
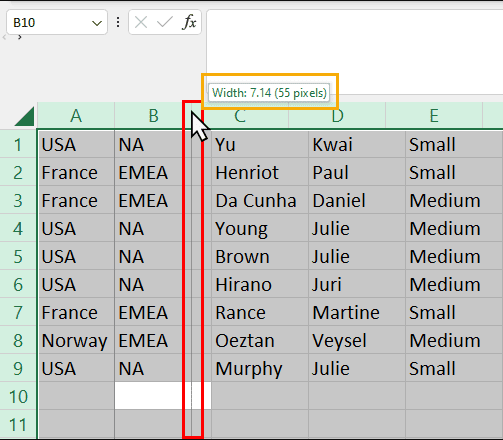
Dragging column edge while all cells are selected — tooltip shows live pixel width
All columns now set to the same width across the entire worksheet
Step 4: Drag to Set Row Height
Repeat the same process for row height. Click and hold the bottom edge of any row number and drag up or down until you reach your target height. Release to apply uniformly.
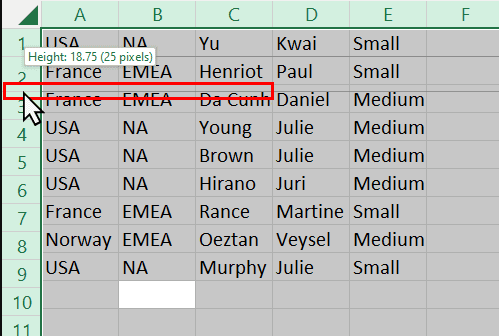
Dragging row edge while all cells are selected — all rows update simultaneously
All rows now set to the same height across the entire worksheet
Method 3: Right-Click Context Menu
The right-click method lets you type in exact values for column width and row height — more precise than dragging and easier than remembering keyboard shortcuts.
Set Column Width
- Select all cells with Ctrl+A or by clicking the top-left triangle.
- Right-click on any column header and choose Column Width from the context menu.
Right-click context menu on a column header showing ‘Column Width’ option
- Type your desired width value in the Column Width dialog and click OK.
Column Width dialog—type a numeric value and click OK
Set Row Height
- Keep all cells selected, right-click on any row number, and choose Row Height.
Right-click context menu on a row number showing ‘Row Height’ option
- Type your desired height value and click OK.
Row Height dialog—type a numeric value and click OK
Worksheet with all cells set to the same width and height via right-click method
💡Tip: Standard row height in Excel is 15 points (20 pixels). Standard column width is 8.43 characters. Use these as a baseline when entering custom values.
Method 4: Paste Special (Copy Column Width from Another Cell)
This method is useful when you want to match the exact column width of one cell and apply it to a range of other cells—without manually entering a number.
⚠️ Limitation: Paste Special with Column Widths only sets column width — it does not set row height. Use another method alongside this one if you also need uniform row heights.
- Click the source cell whose column width you want to copy. Press Ctrl+C to copy it.
Source cell selected and copied—the column width will be transferred
- Select the target cell range where you want to apply the same column width.
- Press Ctrl+Alt+V to open the Paste Special dialog.
- Select Column widths and click OK.
Paste Special dialog with ‘Column widths’ radio button selected
Target range now matches the source cell’s column width
Method 5: Home Ribbon Format Menu (Most Precise)
The Format menu on the Home tab gives you the most direct and precise way to set uniform cell sizes—just type exact values for both row height and column width.
Set Row Height
- Select the cell range you want to resize (or Ctrl+A for all cells).
- Go to the Home tab → Cells group → click Format.
- Choose Row Height from the dropdown.
Home tab ribbon showing the Format dropdown with Row Height option
- Enter your desired height value (e.g., 20) and click OK.
Row Height dialog — enter a numeric value in points and click OK
Set Column Width
- Keep the same range selected, go back to Home → Cells → Format.
- Choose Column Width from the dropdown.
Home tab ribbon showing the Format dropdown with Column Width option
- Enter your desired width value and click OK.
Column Width dialog — enter a numeric value and click OK
✅ Best practice: Use the Home Ribbon method when you need to set specific, repeatable values—for example, when building a template where cell sizes must match a design specification.
Method 6: VBA Macro (Automated — Best for Repeated Use)
If you regularly need to resize cells in different worksheets or workbooks, a VBA macro automates the entire process. Run it once, enter your target dimensions, and it handles everything instantly.
Step 1: Open the VBA Editor
- Go to your target worksheet and press Alt+F11 to open the Visual Basic Editor.
Excel VBA Editor window opens after pressing Alt+F11
- In the VBA Editor, click Insert → Module to add a blank code module.
VBA Editor—Insert menu with Module option selected
Step 2: Paste the Macro Code
Copy and paste the following VBA script into the blank module:
Sub SetCellDimensions()
    Dim selectedRange As Range
    Dim rowHeight As Double
    Dim colWidth As Double

    ' Prompt user to select a range of cells
    On Error Resume Next
    Set selectedRange = Application.InputBox("Select a range of cells", Type:=8)
    On Error GoTo 0

    If selectedRange Is Nothing Then
        MsgBox "No range selected. Exiting script."
        Exit Sub
    End If

    ' Prompt user to enter row height
    rowHeight = InputBox("Enter the row height:")
    If rowHeight <= 0 Then
        MsgBox "Invalid row height. Exiting script."
        Exit Sub
    End If

    ' Prompt user to enter column width
    colWidth = InputBox("Enter the column width:")
    If colWidth <= 0 Then
        MsgBox "Invalid column width. Exiting script."
        Exit Sub
    End If

    ' Apply dimensions to selected range
    selectedRange.RowHeight = rowHeight
    selectedRange.ColumnWidth = colWidth

    MsgBox "Row height and column width set successfully."
End Sub
Step 3: Save as Macro-Enabled Workbook
- Press Ctrl+S in the VBA Editor. When Excel asks whether to save with macros, click No.
Excel dialog asking about macro-enabled format — click No to proceed to Save As
- In the Save As dialog, change the Save as type to Excel Macro-Enabled Workbook (*.xlsm) and click Save.
Save As dialog with ‘Excel Macro-Enabled Workbook (*.xlsm)’ selected in the format dropdown
Step 4: Run the Macro
- Close the VBA Editor and return to your worksheet.
- Press Alt+F8 to open the Macro dialog. Select SetCellDimensions and click Run.
Macro dialog with SetCellDimensions selected and Run button highlighted
- When prompted, select the cell range you want to resize.
Excel input box prompting you to select the target cell range
- Enter your desired row height and column width in the successive input dialogs.
Worksheet with all selected cells resized to the exact dimensions entered in the macro prompts
💡Pro Tip: You can assign the macro to a button on your worksheet or Quick Access Toolbar so you can resize cells with a single click — no need to open Alt+F8 every time.
Which Method Should You Use?
Here’s a practical guide to help you choose:
- Use Keyboard Shortcuts when your data is already in cells and you just want everything to auto-fit neatly.
- Use Mouse Drag for a quick visual resize when you don’t need exact pixel values.
- Use Right-Click Menu when you want to type in exact values without navigating the ribbon.
- Use Paste Special when you want to match the column width of one specific cell across a range.
- Use Home Ribbon when building templates or formatted reports with specific size requirements.
- Use VBA Macro when you need to resize cells repeatedly across multiple sheets or workbooks.
Frequently Asked Questions
How do I make all columns the same width in Excel?
Press Ctrl+A to select all cells, then either drag any column header edge to your desired width or go to Home → Format → Column Width and type a value. All selected columns will update simultaneously.
What is the keyboard shortcut to AutoFit all columns in Excel?
Select all cells with Ctrl+A, then press Alt+H+O+I (sequentially, not simultaneously) to trigger the AutoFit Column Width command. Follow with Alt+H+O+A to AutoFit Row Height as well.
How do I make rows and columns the same size in Excel?
Select all cells (Ctrl+A), then use the right-click context menu or Home → Format to enter exact values for both Row Height and Column Width. This ensures every row and column is set to identical dimensions.
Can I make all cells the same size without changing the content?
Yes—all methods in this guide resize the cells only, not the content inside them. Content is never deleted or modified when you change cell width or height.
How do I resize cells in Excel for the Web?
In Excel for the Web, right-click on a column header or row number and select Column Width or Row Height. You can also drag the edges of headers to resize. VBA macros and Paste Special are not available in Excel for the Web.
Final Thoughts
Making all cells the same size in Excel takes less than a minute once you know the right method. For quick auto-sizing, the keyboard shortcut method (Ctrl+A → Alt+H+O+I → Alt+H+O+A) is unbeatable. For precise control, the right-click menu or Home ribbon format tools give you exact values. And if you’re doing this regularly, a VBA macro is the most efficient long-term solution.
For more Excel formatting guides, visit XcelNote.com—practical Excel tips for every skill level.